

Unraveling South of Midnight
Venture into South of Midnight, where you embody Hazel, a newly awakened Weaver embarking on a deeply personal quest brimming with otherworldly dangers and mysterious abilities. Her journey, estimated to take around 10 to 12 hours depending on your play style and dedication to thoroughness, is rich with narrative progression, concealed treasures, and thrilling encounters.
This exhaustive walkthrough navigates every chapter of the game, pinpointing crucial collectibles, effective battle plans, platforming challenges, and secrets you won’t want to overlook.
Throughout Hazel’s exploration, players can discover numerous Storybook pages that enrich the narrative, Health Filament upgrades to enhance survivability, and a multitude of written notes scattered across the environments, many of which are easily missed. We’ve carefully detailed the whereabouts of each of these elements to keep you on the right track.
For further assistance on your adventure, be sure to explore our dedicated Tips and Tricks and Achievements pages, where you’ll find additional insights and optional challenges to deepen your gameplay experience.
Chapter Breakdown
- Chapter 1 – Night of the Flood
- Chapter 2 – Other Voices, Other Looms
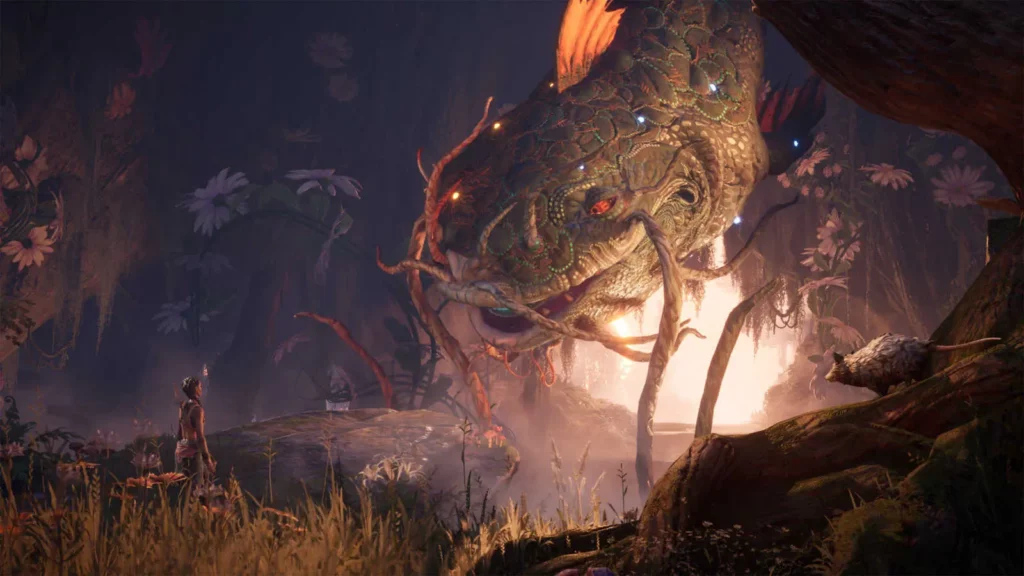
- Chapter 3 – A Big Fish
- Chapter 4 – Wicked Temper
- Chapter 5 – Everything that Rises
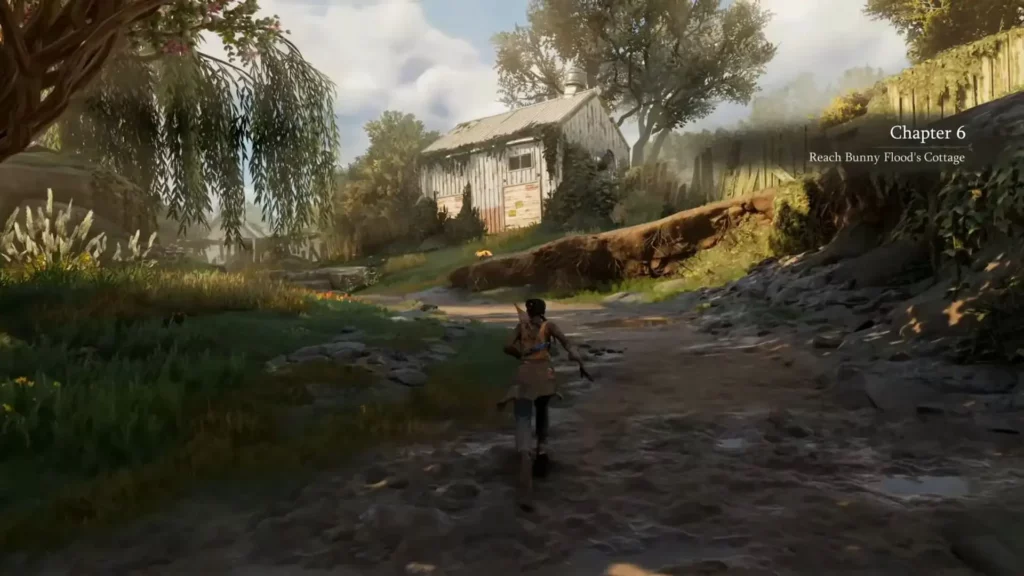
- Chapter 6 – Hush, Hush, Sweet Cherie
- Chapter 7 – A Barman is Hard to Find
- Chapter 8 – Their Eyes Were Watching
- Chapter 9 – Of Webs and Woman
- Chapter 10 – Light in the Darkness
- Chapter 11 – Muddy Waters
- Chapter 12 – The Crossroads
- Chapter 13 – Past Isn’t Past
Walkthrough by Chapter
Chapter 1 – Night of the Flood
Chapter 1 – Night of the Flood
Hazel’s tale commences as a powerful storm bears down on her small community. Initial scenes introduce her mother and several significant local figures, with the immediate focus shifting to the acquisition of an emergency preparedness kit.

Collectibles in Chapter 1:
| Title | Location |
| Bunny’s Note to Lily | Situated on a desk beside the bookshelf after Hazel awakens from a dream. |
| Bunny’s Desk Entry | Located within Bunny’s office, accessible via a balcony after ascending ledges outside the house. |
| Bunny’s Lounge Chair Entry | Found resting on a chair within the same office where the desk entry is located. |
Chapter 2 – Other Voices, Other Looms
Hazel experiences her initial combat encounters while uncovering knowledge from the past and confronting hostile spirits known as Haints.
Collectibles in Chapter 2:
| Title | Location |
| The Weaver’s Call | After gathering the first Floof knot, examine the first house on the left in the residential area near the river. Interact with the wall art. |
| Spirits, Speak to Me! | Located on a barrel on the barn’s upper floor near the exit, shortly after acquiring the Strand Pull skill. |
| Please speak to me.. | Discovered behind some breakable branches on the left side of the path after engaging Haints near the barn. |
| Stigma and Sorrow | Positioned on the left wall upon entering the cave; activate the glowing wall art. |
Chapter 3 – A Big Fish
Hazel further develops her Weaver abilities and encounters an unexpected ally. This chapter presents several platforming sequences and concealed collectibles.

Collectibles in Chapter 3:
| Title | Location |
| The Happiest Day | Situated after learning the double-jump ability; the art glows on a wall just before reaching the first Health Filament. |
| Health Filament | Located directly ahead on the main path from the previous item. |
| The St. Sylvain Bulletin | Affixed to the exterior wall next to Rhubarb’s front door. |
| Follow the Lights | On a post near a boat at the end of the dock behind Rhubarb’s house. |
| Ain’t Wanted Here | Inside a two-story house after passing the initial bramble expansion. The note is on a table just inside the entrance. |
| A Gift for Corrine | Behind the house featuring a Weaveable staircase, near a small shack with a metal sheet. |
| Beggin’ your pardon, Mayor. | Located inside a house marked by a Stigma above it. The note rests on a table in the main room. |
| Come One, Come All! | Situated on the second floor of the same house as above, attached to a post beside the exit to the balcony. |
Chapter 4 – Wicked Temper
Hazel and Catfish confront a dangerous creature lurking in the waters. Though brief, this chapter contains important items and challenges.
Collectibles in Chapter 4:
| Title | Location |
| Grocery List | Discovered after the initial fight near a dock; veer left past a sign, cross some grapple points, and find the note on a barrel. |
| Lay Off Buddy | Inside the house in the same location as the previous collectible, found on a bed. |
| Burrower’s – Lord’s Day | Concealed inside a dead tree near a cemetery in front of the church. |
Chapter 5 – Everything that Rises
Hazel and Catfish return to face Two-Toed Tom in a climactic showdown deep within his territory. This chapter holds the most collectibles so far, blending intense combat with significant narrative developments.
Collectibles in Chapter 5:
| Title | Location |
| Burrower’s – Pieces of the Self | Found in a hollow tree beside the first spot where Crouton can enter, shortly after unlocking his spell. |
| Statue Flyer | Positioned on a broken fence post outside the initial battle area, just beneath the large Auntie Belle’s sign. |
| Burrower’s – Iron | Located on a box near Jolene’s church fence, beside some tires and parked cars. |
| Hollow Dreamers | On a couch on the porch of a bramble-covered house across the water from Jolene’s church. |
| Health Filament | After defeating the first Slug Haint, proceed in the opposite direction of the guiding strand to a field of sunflowers, then ascend a water tower using echoes and grapples. |
| Kids Need a Hand | Inside the house that becomes accessible after the Slug Haint fight. The note is on a table immediately to your left. |
| Jo’s Penance | In the upstairs bedroom of the same house as the previous note, sitting on a desk. |
| Yard Sale Notice | At Swopes Farm, climb the high tower via an echo box, leap down to hay bales, and continue to a house with the note on a chair at its entrance. |
| Honor thy Father and Mother | Located in a house near the Stigma arena at the far end of Swopes Farm, in the first room to the right. |
| A Bashful Farmhand in the Setting Sun | Inside the same house, upstairs in a bedroom on the right-hand side. |
| The Pigs are a Loss | Situated in the first room of the pig factory, on a table just inside the entrance. |
| Sutter’s Will and Testament | After defeating Two-Toed Tom, locate the squealing pig and utilize a nearby plank to reach ledges. The note is above the pool of liquid where the pig swims. |
Chapter 6 – Hush, Hush, Sweet Cherie
Hazel visits Bunny’s secluded cottage in her search for clues regarding Huggin’ Molly. This chapter combines exploration with memory fragments and quiet revelations.
Collectibles in Chapter 6:
| Title | Location |
| Keep Out Sign Materials | Found on a box after using an echo boat to cross water. Located beside the road near a higher ledge. |
| Abernathy’s Lament | Atop a box on a barn’s upper level. Requires clearing a Stigma and using a newly available echo cart to access the roof. |
| Health Filament | Located directly adjacent to Abernathy’s Lament in the same barn. |
| Burn After Reading | Found on a box near two rocks inside a combat arena, accessible by turning left before Bunny’s gate. |
| Correction Requested | On honey crates near sunflower beds behind Bunny’s cottage, to the right of a small shed. |
| Notes on the Rogarou | Inside the first room to the right in Bunny’s cottage, on the central table. |
| Bunny’s Journal – On Weavers | In Bunny’s upstairs bedroom, on the left-side dresser. |
| Notes on Dreams and Fog | Also in Bunny’s bedroom, but on the dresser to the right of the bed. |
| Missing Children List | Found in a secret room connected to Bunny’s bedroom. Interact with the rabbit statue to reveal the hidden space. |
| Burrowers Hate a Liar | Located inside a dead tree along the main path after the cutscene with Bunny, following explosive mushrooms. |
| Huggin’ Molly Sightings | Past the scene with Catfish, take the left fork of the road across an echo bridge to a hidden combat zone. Found on a box near the exit. |
Chapter 7 – A Barman is Hard to Find
Hazel searches for Laurent at his juke joint while piecing together more clues about Huggin’ Molly’s past.
Collectibles in Chapter 7:
| Title | Location |
| The Lost Boy | Located behind a climbable wall across the river after Hazel spots the sawmill. Found on a box near some Floofs. |
| Lost Liquor | Appears after the initial combat sequence, placed on a box at the edge of the battle zone. |
| Health Filament | Positioned directly ahead of the Lost Liquor note, behind breakable branches. |
| Lieutenant Laurent | Resting on crates of honey to the right of the first memory object. |
| The Babblin’ Boy | In a cave blocked by branches after crossing the river; found near a metal sheet. |
| Baby Faced Laurent | On a rock near boxes and a bear, to the left after echo-crossing a broken bridge. |
| Burrower’s – Lil Drunkards | Hidden inside a dead tree at a split in the main path. |
| End of Prohibition | Found under a large tree, after Crouton clears a Stigma. It lies on the ground beside the path. |
| Boy out of Time | Beside a house near the previous collectible, next to broken doors. |
| Heart of Lace | Upstairs in the juke joint after meeting Laurent, beside a photo. |
| Treatment | Located in the first building on the right as you enter Milltown, sitting on a table. |
| A Mother’s Last Words | In the same room as the Treatment note, next to a large Floof knot. |
| Everything Helps | Inside a damaged structure near a sawmill and combat arena. The note is on a large box. |
| A Father’s Job | In a large building with a crane, on a long table near saws. |
| A Penny Saved | Upstairs in the sawmill; accessible after grappling across a floor gap. |
| Maintaining Productivity | On a back table in an office attached to the room with the previous item. |
Chapter 8 – Their Eyes Were Watching
Hazel travels to the Witch’s Nose, where Huggin’ Molly’s lair awaits. This shorter chapter contains fewer items but signifies a crucial narrative development.
Collectibles in Chapter 8:
| Title | Location |
| Delta-346 – Missing Child | On a stump near the landing point after the initial wind tunnel. |
| Delta-346 – Weird Happenings | After the second wind tunnel, near a cliff’s edge to the left. |
| Delta-346 – Red Yarn | On a hill near sunflowers after the first wall run. |
| Delta-346 – Search Called Off | Just past a combat zone near a cave mouth wrapped in red yarn, beside a fallen log. |
Chapter 9 – Of Webs and Woman
Hazel finally tracks Huggin’ Molly to her hideout. This chapter is filled with confrontations and truths.

Collectibles in Chapter 9:
| Title | Location |
| Burrower’s – Feline Intuition | After exiting the cave, inside a tiny tree to the right of the road. |
| Cross my heart… | Inside the red-yarn-covered house across the bridge. Found on the couch. |
| Dear Santa | In the same house, next to the kitchen sink. |
| Please Keep In Mind | In the house behind a combat arena near the red-yarn house. |
| You’ll be sorry | At the end of a hallway in the same house, near the fridge. |
| Molly Gives A Fright | On a picnic table outside the house after leaving the red-yarn building. |
| Mandatory Overtime | Inside the Pure Pine factory’s office, accessed after using Crouton to power a generator. |
| Health Filament | On a ledge behind Molly’s home before unraveling the nearby tangle. |
| She Did It | On a table along the stairway leading to Molly’s house. |
| Why not me? | Inside Molly’s home, beside the fireplace on the first floor. |
| Dear Miss Molly | On the table next to the staircase inside the same house. |
| Decision of Transfer | Upstairs in Molly’s house, on a desk near the fireplace. |
| Is it true? | Inside a large home in Molly’s cavern, on a bed near the entryway. |
Chapter 10 – Light in the Darkness
Hazel finds herself wandering through a haunted swamp filled with echoes and memories. Ghostly figures reappear as she seeks a path forward through the mist and decay.
Collectibles in Chapter 10:
| Title | Location |
| Hope’s Crossing Homecoming | Shortly after the first battle, when the path diverges, turn left instead of entering Crouton’s burrow. The art is visible on the wall near some Floofs. |
| Sleep and Smoke | After acquiring the first spindle, look for a dilapidated house on the right past some explosive mushrooms. The wall inside displays this blue art. |
| Health Filament | Located after securing the second spindle. Utilize echo objects and grapples across the water, then climb to claim this collectible. |
| A Close Call | While following the guiding strand to a bonfire, enter a large building using echo stairs. The note is depicted as blue art on the interior wall. |
| A Grand Wedding | Behind the initial bonfire tree, follow the path near bramble, then grapple across a gap to reach a ruined structure. The art is on the left wall inside. |
| The Flower Child | Found on the left-hand wall inside Honey’s home, next to some Floofs. |
Chapter 11 – Muddy Waters
Hazel teams up with Honey to help her find peace, venturing deeper into the swamp’s secrets aboard a wrecked ship and through treetop paths.
Collectibles in Chapter 11:
| Title | Location |
| An Anguished Cry | Found as blue art on a rock after following Honey onto a dock with explosive mushrooms. Turn left after jumping down. |
| Stowaway’s Tin Box | Inside the second level of the shipwreck, beside a table and Floofs in the room containing a Stigma knot. |
| Bill of Fare | On the third level of the wreck, on a table to the left side where Hazel recalls the ship. |
| Old Pain, New Life | Visible from the battle arena after unraveling the second echo knot. The art is painted on a large root in the direction of the strand. |
| Health Filament | From the same arena, proceed in the opposite direction of the strand. Follow a path through the treetops to reach this item. |
| A Bittersweet Reunion | After viewing memories from the third echo knot, the note appears as art on a rock to the left of the guiding strand near water lilies. |
| False Knowledge | Discovered in a room on the ship after Honey assists Hazel with boarding. It’s to the left after breaking some planks. |
| Captain’s Log | After taking the elevator |
Chapter 12 – The Crossroads
Hazel reaches the enigmatic Town on the Tapestry, a crossroads of stories, ghosts, and memories. This chapter features surreal exploration and the largest collection of collectibles so far.

Collectibles in Chapter 12:
| Title | Location |
| Should I Leave? | On a stump beside the signpost at the chapter’s initial path junction. |
| Should I Stay? | After triggering two sign changes, examine the same stump once a caravan appears. |
| The Record Keeps Skipping | Inside Roux’s caravan, beside a gramophone near the staircase. |
| Milk and Sugar, Love? | Near the previous note, on a dresser next to a tea set. |
| Ring, Ring | Taped to a tricycle at the hall’s end after the dresser. |
| Roux’s Limerence | At the top of the caravan stairs, directly on a table. |
| The Hungry Maw | Attached to a red refrigerator near a turn in the hallway. |
| Still Stars Don’t Remember | After the first combat encounter, behind a fence with two streetlights and a movable box. |
| Joe Goodfellow, 74 | On the door of a pink building beside the nearest wind tunnel, visible from the battle arena. |
| The Many Little Things | On a balcony reached via wall run and wind tunnel; check the chair to the left after landing. |
| Hollowed Love | On a table on the right side of the same balcony. |
| Spit It Out | After another wind tunnel, look right to find a table beside echo platforms and Floofs. |
| Health Filament | Utilize echo platforms to enter the wind tunnel after collecting the note. It leads to the Health Filament. |
| Ella Mae, 7 | On a door next to a mural under a red and blue sign for Gouldeau’s Jazz. |
| I miss, I miss, I miss | Below a yellow building near Floofs, reached using an echo platform found opposite Ella Mae’s location. |
| Would Be Beautiful | After the second combat zone, turn around near the Dreamy Spirits neon sign and Strand Pull a billboard to reach a hidden area. |
| Tempest Hamlin, 42 | Just past the Dreamy Spirits sign, on a door beneath the red and blue Taverne sign. |
| Passage | On the second level of the clocktower, after leaping across a gap near a gear. |
| I’m Trying | After a grapple and near an elevator shaft, pass a broken gear to find a note near a stool and light. |
| You Gotta Release It | After the top-of-clocktower battle, circle to the back before entering the wind tunnel to find a note beside Floofs. |
Chapter 13 – Past Isn’t Past
Hazel confronts Kooshma in a surreal, theatrical chapter as her connection with Lacey grows clearer. Though short, it offers meaningful closure and final discoveries.
Collectibles in Chapter 13:
| Title | Location |
| Run, Rabbit, Run | After the initial chase sequence, enter the second set and inspect a hidden room to the left of the stage cart. The note lies on a workbench. |
| Eternally She Waits | After the third chase, examine the left side of the new set. The note is on a desk near several cameras. |